Pre-marking is simply a way to provide the member utility company locators with more specific knowledge about where on your property you plan to do the work and lets them focus on just those areas. Pre-marking needs to be done prior to contacting JULIE. Pre-marking also reduces the amount of paint and flags left on your property by the locators.
Tips for Physically Pre-Marking
Use only white paint and/or flags (black when snow is present)
Pre-mark your project prior to contacting JULIE
Paint with dashes, lines or arrows – The width of each mark should be approximately 2″ – The length of each mark should be 6″ to 12″ – The distance between marks depends on site conditions, but should be no greater than 20′ – Company identification should be painted at reasonable intervals to allow for quick identification – Pre-marks that box in the excavation are limited to that box (unless specified otherwise on the locate request
Mark the center line if doing linear work
Indicate on your locate request that you want locators to mark at least 10 feet past your pre-marked area
How Do You Pre-Mark?
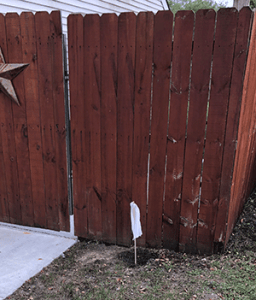
For a single point of digging like a tree, shrub, flagpole, etc., gently place a small stick or similar item into the ground with a white rag tied to it and ask that an area around the stick, for example a 10-foot radius, be marked.
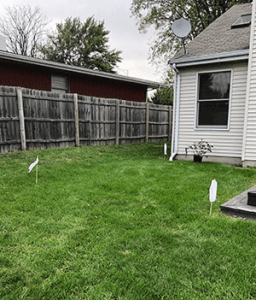
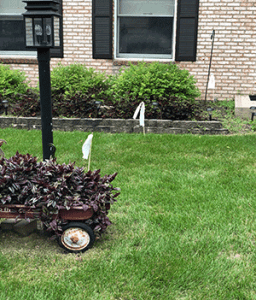
For larger work areas like decks, patios, sheds, pools, etc., use multiple sticks with white rags to mark the corners of the work area. It is recommended to place the sticks 5 to 10 feet past the actual edges of the work to allow for slight changes in your project scope.
For jobs that require digging a trench—like wires or pipes to a garage, shed, pool or yard feature for power, gas, water or communications lines as well as drain lines from gutter downspouts—place the same type of sticks with rags along your intended path and request a path wide enough for your work plus a bit of a cushion be marked. For example, locate a 10-foot-wide path along the pre-marked path from the corner of the house closest to the garage to the closest side of the garage, or words to that effect. Pre-marking can also be accomplished by using white spray paint. Look for white “inverted” marking paint at your favorite home improvement stores…it is meant for this type of use and typically fades much faster than regular spray paint. White marking flags may also be used in place of sticks and rags and may also be available at home improvement stores.